Wednesday

Future personal developments in using CAD


From completing and reflecting on this CAD skills audit, along with visual evidence, I can see the areas of CAD that I have worked on and also the areas that need development/research. 

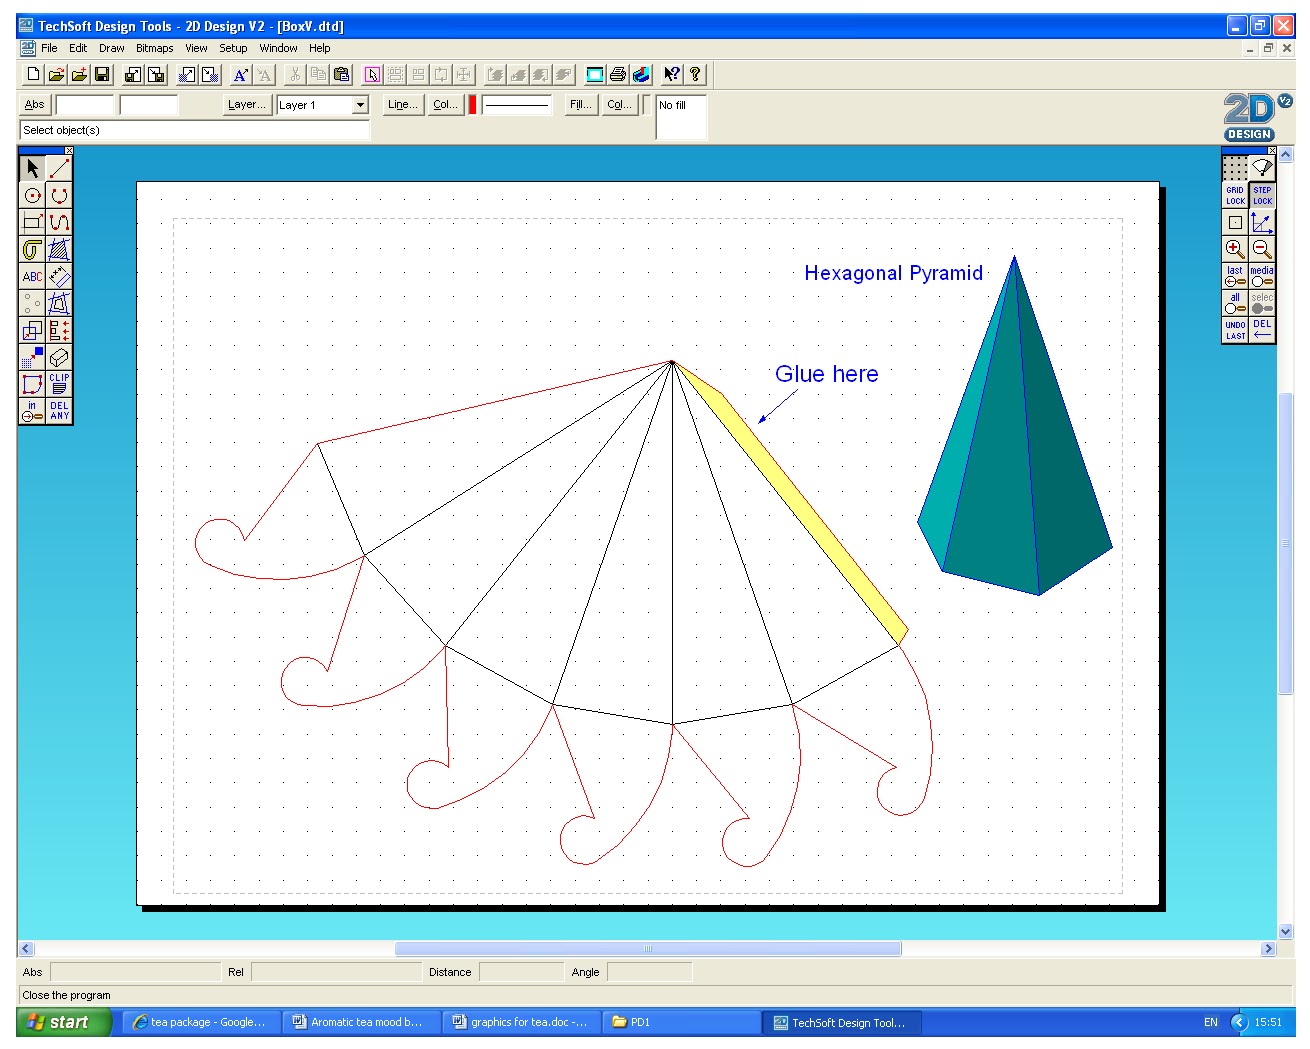
Software such as 2D Design and Pro/DESKTOP I am comfortable using and exploring. These are two design areas that I have been working with for many years, and have included them in such projects as my A Level work and Product Design 1 and 2. 

New CAD areas to me include Adobe PhotoShop and Google SketchUp. For both of these I have been able to experiment with and explore many features.

My development work/areas are using programs such as Pro/ENGINEER and Adobe Illustrator.


Other evidence - other CAD software


Other evidence - CAD software

- SpeedStep, ProSketch/ProPainter

Software such as SpeedStep is very useful for creating fashion items, accessories, designs for outputs, etc.
In education, software such as this can be used to to accompany textiles based projects, used to produce designs for construction/cloting, also for use with outputs such as sublimation printing, etc. Also, certain software allows for colurs, patters, etc to be added to designs, to make them more real and visual.

Here I have created a shoe design using ProSketch.


Using ProPainter, I have added colour and patterns.


Computer generated illustrations


Computer generated illustrations -


Using different CAD software to produce design presentations/images, etc is particularly valuable. Images created can be posters, adverts, packaging and so on. These images/products, can be used and placed in a virtual environment that is appropriate to the context, and text, layouts, other images, etc, can be included.


Photoshop
PhotoShop-ed poster (tea advert)


I have produced a (poster) tea advert using Adobe Photoshop. It is a resourceful program that allows the user to create 2D graphcs for various end uses. Here I have made a tea advert to promote a new range of tea. This was used in my Product Design 1 module.

Pro/DESKTOP / SolidWorks - Rendering image ('Album')


Rendering an image -

The Album feature in Pro/DESKTOP is used for rendering designs that are created. It is predominantly used to visualise a product that brings into play texture mapping, backgrounds and lighting tools. Also, visual ‘materials’ can be added along with other techniques.


To show an example for a rendered image, I firstly designed a 'lego brick' using Pro/DESKTOP Design, and opened it using the Album feature. I then selected the material (plastic, polished), added it to the design and changed the colour of the brick and the background to create an effect. 

Pro/DESKTOP / SolidWorks - Engineering drawing

Engineering drawing -

3D modelling on Pro/DESKTOP allows the user to create a 3 view orthographic drawing with isometric features.


Orthographic drawing showing different views and anles of my 'lego brick'. The various dimensions are shown.


Pro/DESKTOP / SolidWorks - 3D model of part of a product

3D model of part of a product


I have created this (my pewter cast design) as a 3D digitally produced CAD drawing, using the program SolidWorks. It demonstrates the use of 3D modelling.


Reverse engineering -

Using software such as Pro/DESTOP or SolidWorks links well with the National Curriculum requirements for Design and Technology, to investigate and assemble/disassemble products.
Features allow the user to create accurate designs, produce components, analyse form and pupils can learn about the software.

To create this shape I have used a revolve profile on Pro/DESKTOP.


This is a helix shape I have created, also using Pro/DESKTOP.


Pro/DESKTOP / SolidWorks

Pro/DESKTOP / SolidWorks


Pro/DESKTOP is a feature based solid modelling and assembly modelling package with an inbuilt feature-based drafting package designed to run on a PC. The software allows for 3 major parts – these are 3D Design, 2D drafting and a 3D Album or visualisation package.

Tuesday

2D Design Tools - Features


Features

·         Exhaustive geometrical constructions including circles, arcs, lines, tangents, normals, etc.
·         Comprehensive drawing aids, user-defined grids and attach (snap).
·         Powerful tools such as fully tuneable bezier curve drawing, text flow along a path, etc.
·         Comprehensive text facilities , even exceeding those in many sign-writing packages.
·         Single line fonts and an in-built font editor/designer.
·         Bitmap to vector conversion.
·         Clip path tools, essential for creating professional high end graphic images.
·         Comprehensive graduated, texture and pattern fill routines.
·         Comprehensive transformation tools including move, mirror, size, array and distort.
·         Automatic or manual dimensioning. Work to pre-set or user-defined scales.
·         Contour feature to off-set lines. Invaluable for creating cutter-compensated tool paths or tracing.
·         Powerful editing and delete features, unlimited user-named drawing layers. Cut and paste to and from many other packages, including Word.
·         Import/Export BMP, DXF, EMF, HPGL, TIFF, JPEG, PNG, WMF, plus legacy Acorn formats.


2D Design Tools - Basic packaging graphics

 Producing nets - development for packaging


Basic packaging graphics - 


2D Design is very functional for combining vector drawing with text, bitmaps, photographs or clip-art to create graphic products. Other editing tools allow any image to be clipped to size and shape, and bitmap images can be converted into a vector drawing, font can also be customised and colour, texture or pattern, etc can be added. 

The end uses for designing graphics/packaging on 2D Design include packaging products, posters, point-of-sale displays, greeting cards, etc. In addition, 2D Design can also incorporate imported photographs, scanned sketches and research material alongside CAD drawings. 

In schools, this is often seen in the form of net making, for example. It can also be used alongside GCSE Graphics or Food Technology.

2D Design Tools - Machine drawing for laser cutter or CNC milling/engraving machine

This is for a novelty calculator project. The designs here will be cut using the laser cutter.


This design was for my pewter-cast part in Advanced Manufacturing. The output device used for this is the CNC milling machine. Moulds can be created from these designs using material such as MDF.  

This is the final pewter-made part, inside the MDF mould that was maunfactured from a design drawn on 2D Design.


Machine drawing for laser cutter or CNC milling/engraving machine -


Using 2D Design allows the page to be set-up depending on paper source and also to suit the machine for the intended use. This means that the design being created will ‘fit’ and the user can change the positioning of the job for more accuracy on the media/work area. This is one of the links between 2D Design drawings and the output device. Furthermore, features such as registration marks can be added for such cutting and print machines. 2D Design works with simple output dialog boxes, which ease the process of manufacture.

The program is extremely useful when ‘designing for manufacture purposes’. As mentioned, the necessary tool requirements can also be set efficiently. For the purpose of ‘Advanced Manufacturing Module Task 2’, I have used 2D Design to design/draw the shapes/designs for parts of my vacuum formed part and pewter-made part. Both of these techniques allowed me to easily create the accurate shape I wanted, and could be used for a CNC output, as I have cut them using a CNC milling machine.

2D Design Tools - Engineering drawing


Here is an orthographic drawing/design of my Robot Dancer used in my Energy and Machines module.


Engineering drawing - 

2D Design is essentially an electronic drawing board with drawing and design tools that enables the user to draw accurately and add dimensions as such. The use of tools that are used for engineering drawings are often the line-geometry, transformation, edit, attach and dimensioning tools.
Layers can be used for construction work, standard sheet templates, dimensioning or output to CAM, etc. 


2D Design is very practical and enables complex computer generated drawings.

2D Design Tools


2D Design is a software program created by TechSoft to generate drawings and design features. Because of the programs ease of use, it means that is at the appropriate CAD standard for the vast majority of UK secondary schools.

2D Design allows users to produce traditional engineering drawings, colourful ‘free-form’ designs for embroidery, or smart graphical presentation sheets – all using a range of tools.

CAD in schools


 Computer Aided Design - Overview

Computer Aided Design (CAD) methods are tools to enable the design process. CAD tools can support designing and making activities in combination with other methods of modelling ideas, such as drawing and prototyping.

In design and technology education, it is important that CAD and CAM is seen as a tool to use in combination with other modelling and making activities. In addition to this, CAD has much more to offer in developing and reinforcing skills across the school curriculum.

CAD using in schools enables pupils to engage with different strategies available to model a product/part, etc. The implications surrounding this include the time it takes to model, the software/program (school licences and costs) and the ease of use for CAD users.

The following is an extract taken from the ‘CAD/CAM in schools’ website, which here outlines why CAD/CAM in schools is used and why this scheme is important.

“The overall aims of the CAD/CAM in Schools programme are:
  • To ensure all secondary schools in the UK have access to CAD/CAM
  • In English schools, the scheme seeks to provide support for the teaching of CAD/CAM at Key Stage 3 and beyond
  • To use software provided by PTC, Delcam and Speed Step to enhance and develop the use of CAD/CAM in the design and technology curriculum
  • To ensure all teachers using the software with students are adequately trained in both the use of the software and the appropriate curriculum applications
  • To ensure all students can make maximum use of the software, including at home
  • To provide an effective scheme which is well communicated to all parties
  • To develop industrial links with companies which will provide realistic contacts for schools.”